Tuesday, July 10, 2012

The Legend of Zelda Key Holder


I've been meaning to make a key holder to go by our front door for a while now, but then Perler Bead Armageddon took over all my crafting ambitions. However, we are tragically out of black Perler beads right now (and the nearest store that has any is probably 30 min away), so I turned to other pursuits. Namely, this.  Apparently it got hugely popular on Reddit, so the Etsy shop owner is (or maybe was) swamped with orders for it. Rather than pay $19 with shipping for one, I decided it couldn't be too hard to make myself... and it wasn't!

Supplies needed:

- one wooden rectangular plaque (whatever size you so desire - I chose a 5x7 inch) (should be $2-$3)
- a color printer and paper
- black paint suitable for wood ($1-$3)
- a brush ($1 for a cheap sponge brush)
- ModPodge ($5-$6)
- a hook (I used one called a Tieback hook that was about 1 1/4 in long including the screw-in part) (~$2 for a pack of 6)
- something to hang it on the wall

Step 1: paint your wooden plaque black.

Step 2: Let it dry. Apply second coat of paint if necessary.

Step 3: Wash your paintbrush.

Step 4: Re-size the following image to fit your plaque, and chop out all the unnecessary bits. Photoshop is easiest to use for this part, but if you're struggling, I've inserted the template I used in the end after the actual picture.

Original picture

Re-sized to fit a 5"x7" plaque, though my plaque has a border so the actual picture should be 6.5"x4.125". Nathan did this part for me in Photoshop and then chopped out all the extra black so that we didn't waste the ink from our printer.
Step 5: Cut out the pieces of the picture. I left the top part all in one chunk, but cut out the sword and Link separately.

Step 6: Apply a thin coat of ModPodge to your plaque. I chose to cover the entire plaque so as to have an even finish, but you'll see in later steps that it doesn't really matter if you do that now or not.

Step 7: Carefully place each piece of paper where you want it on your plaque. Smooth it down and let the ModPodge dry completely.

Step 8: Put another coat of ModPodge over the entire plaque to seal the paper. If desired, apply a second top coat after the first coat dries.

Step 9: Screw in hook for keys wherever you want. I put mine between the sword and Link so that I wouldn't mess up the paper at all.

Step 10: Install hardware to hang it up on the back of the plaque. And you're done!

Completed key holder!

I actually did the ModPodge steps a little differently - I basically combined step 7 and 8, attaching the paper to the plaque and sealing it all in one go. I think as a result, my paper got a little too wet and the ink ran a bit. You can't really tell in the final product, but hopefully letting it dry in between will prevent that from happening to you.

All in all, this project cost less than $10, not including the cost of the ModPodge (which you only use a little bit of, so if you can get away with borrowing some from somebody, even better). All the supplies were from Joann Fabrics, though I had to ask someone where the hooks were because they put them in a very non-logical place...  Total time spent on the actual project was maybe 30 min, adding in 1-2 hours of drying time for the paint and ModPodge layers.

If you decide to try it yourself, let me know how it goes!

UPDATE: If you don't like being able to see the edges on the paper bits, you can also print out the picture with the full black background and ModPodge it onto the front of the plaque, effectively covering the whole front part instead of having pieces. It will use a lot of black ink but won't show any faint lines.

Friday, July 6, 2012

Chocolate NES Controllers

My awesome mother-in-law sent us a care package a while back, and today I pulled out all the pieces it contained and made some sweet treats for our bead party this week. What did this alleged package contain? Well... just three things, actually: 5 lbs of Ghiradelli semi-sweet chocolate chips, 3 tubes of colored chocolate  for detail work, and 2 chocolate mold trays of NES controllers!

Step 1: fill in the details. After filling in as much detail as desired, freeze until chocolate is hardened.

Step 2: fill in remainder with melted chocolate. To melt chocolate, microwave on medium power, stirring every 30 sec until fully melted.

Step 3: Freeze until hardened, then pop them out of the mold.

I experimented a little with more detail once I did the first batch.

I really like how they turned out! I did half semi-sweet and half milk chocolate.

These were very easy to make and turned out really well. I think I might experiment with add-ins to the chocolate next time... maybe a little caramel or pretzel bits to jazz them up even more!

Thursday, July 5, 2012

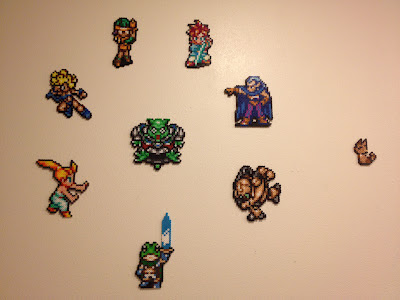
Perler Beads: Chrono Trigger

Chrono Trigger: undoubtedly one of the best SNES games released. Nathan gets all the credit for today's showcase... he made every single one of them in two days without any help from me (except the ironing. I always get to iron them. I'm just that lucky). What's more, seeing them got one of our writing friends intrigued in the game, so we made him watch a little of it and now he wants to play it. (Or so he claims.) Since Chrono Trigger rivals Final Fantasy VI for most awesome RPG on the SNES, this is a good thing.

Anyway, on to the picture. This set resides on the same wall as Megaman but higher up. (It was that, or fill the space with Megaman bosses from all the other games. I wasn't particularly keen on the idea of having Sheep Man on our wall though.)

Starting at the bottom and going clockwise: Frog, Marle, Ayla, Lucca, Chrono, Magus, Robo; center is Ozzie, and of course the cat is off to the right. If you've played the game, you know why the cat is there...
This set turned out particularly good; most of the colors used in the original sprites had close counterparts to the bead color options, which always makes for easier and better shading.

I'm hoping to make an online photo album that shows a close up of each sprite individually that we've made so far and list which colors we used to make it; that way it's easier to replicate them. But that's going to be a massive project in its own right, so it might not be done for a while...

Wednesday, July 4, 2012

Perler Beads: Mario

I know you've been waiting a long time for this... I hoped to get it up Monday (but not everything was done yet), intended to post it last night (but we didn't finish putting it all up until 11pm), and am finally doing it now (hooray for holidays and no work!). :) I guess that's what happens when you keep thinking of more cool stuff to add to a themed wall. And there are a lot of cool things I didn't even get to with the Mario wall.

So without further ado:

Super Mario 1: cheep cheep, little Mario, goomba, question block w/regular blocks, koopa paratroopa, Lakitu, spiny

Super Mario 2: shy guy, Princess holding a turnip, tweeter, phanto, key, Birdo (this collection turned out really eclectic for some reason...)

Super Mario 3: angry sun, piranha plant shooting fireball (aka Venus fire trap), Mario in a boot (aka Kuribo's shoe), question block, paragoomba (and yes, I know it's not technically possible to have the boot on the same level as the angry sun)

Super Mario World: P block, boo, caped Mario, fire flower, question block, coin, wiggler

Super Mario World: Yoshi montage: egg, baby Yoshi, grown up Yoshi, and a bonus red shell

To give some perspective: Yoshi montage resides next to Dr. Mario and viruses

zoomed out shot of the Mario wall

A view of the entire Mario wall
The silk painting hangs on the other side of this lip, for those of you trying to visualize our apartment decorations as a whole.

Also, we're thinking of adding some Yoshi's Island sprites to the end since there's still a little room, so there may be an update in the future with that.

What are some of your favorites that we left out? I'm kind of mourning the lack of a bob-omb myself...

Sunday, July 1, 2012

Perler Beads: Final Fantasy VI


Nathan's been hard at work with his pet project, making all the party members from Final Fantasy VI. And then he decided to make a few extra NPCs and bosses to go along with the party. If you've played the game, you can imagine this resulted in a lot of new wall decorations... and we're quite pleased with how it all turned out.


Final Fantasy VI party, in one possible order you can acquire them. From top left: Row 1: Terra, Locke, Edgar, Sabin, Celes, Row 2: Interceptor, Shadow, Cyan, Gau, Setzer, Row 3: Strago, Relm, Mog, Umaro, Gogo
The emperor, Kefka, and an Imperial soldier in Magitek armor
Esper Terra, Cid, General Leo, and Bannon
Ultros and Maria (from the opera)
Above the mirror: Esper Terra, Cid, General Leo, Bannon. Above the door: Ultros and Maria.  On the wall to the right: the party. To the left (not shown): Emperor, Kefka, Imperial soldier.